Best kayak anchor trolley system
Oh, the joy and frustration of kayak fishing! You've paddled out to that perfect spot, you've got your line in the water, and then a sudden gust of wind or current decides your prime fishing real estate is actually somewhere else. It's enough to make you want to throw your paddle in the water (but please don't!). Trying to maintain position while battling a feisty walleye or precisely presenting a lure can be a real headache. This guide is all about tackling that common problem head-on, offering a comprehensive look at the best kayak anchor trolley systems to keep you exactly where you want to be, making your next Ontario fishing adventure smoother and more productive.
Understanding the Kayak Anchor Trolley System
Anyone who’s spent a serious amount of time fishing from a kayak knows the struggle of staying put. Whether you're trying to work a specific weed line on Lake Simcoe or hold steady in a current on the Grand River, drifting can quickly turn a promising spot into a missed opportunity. That's where an anchor trolley system comes into its own, providing a simple yet ingenious solution to a pervasive problem.
What is an Anchor Trolley and Why You Need One?
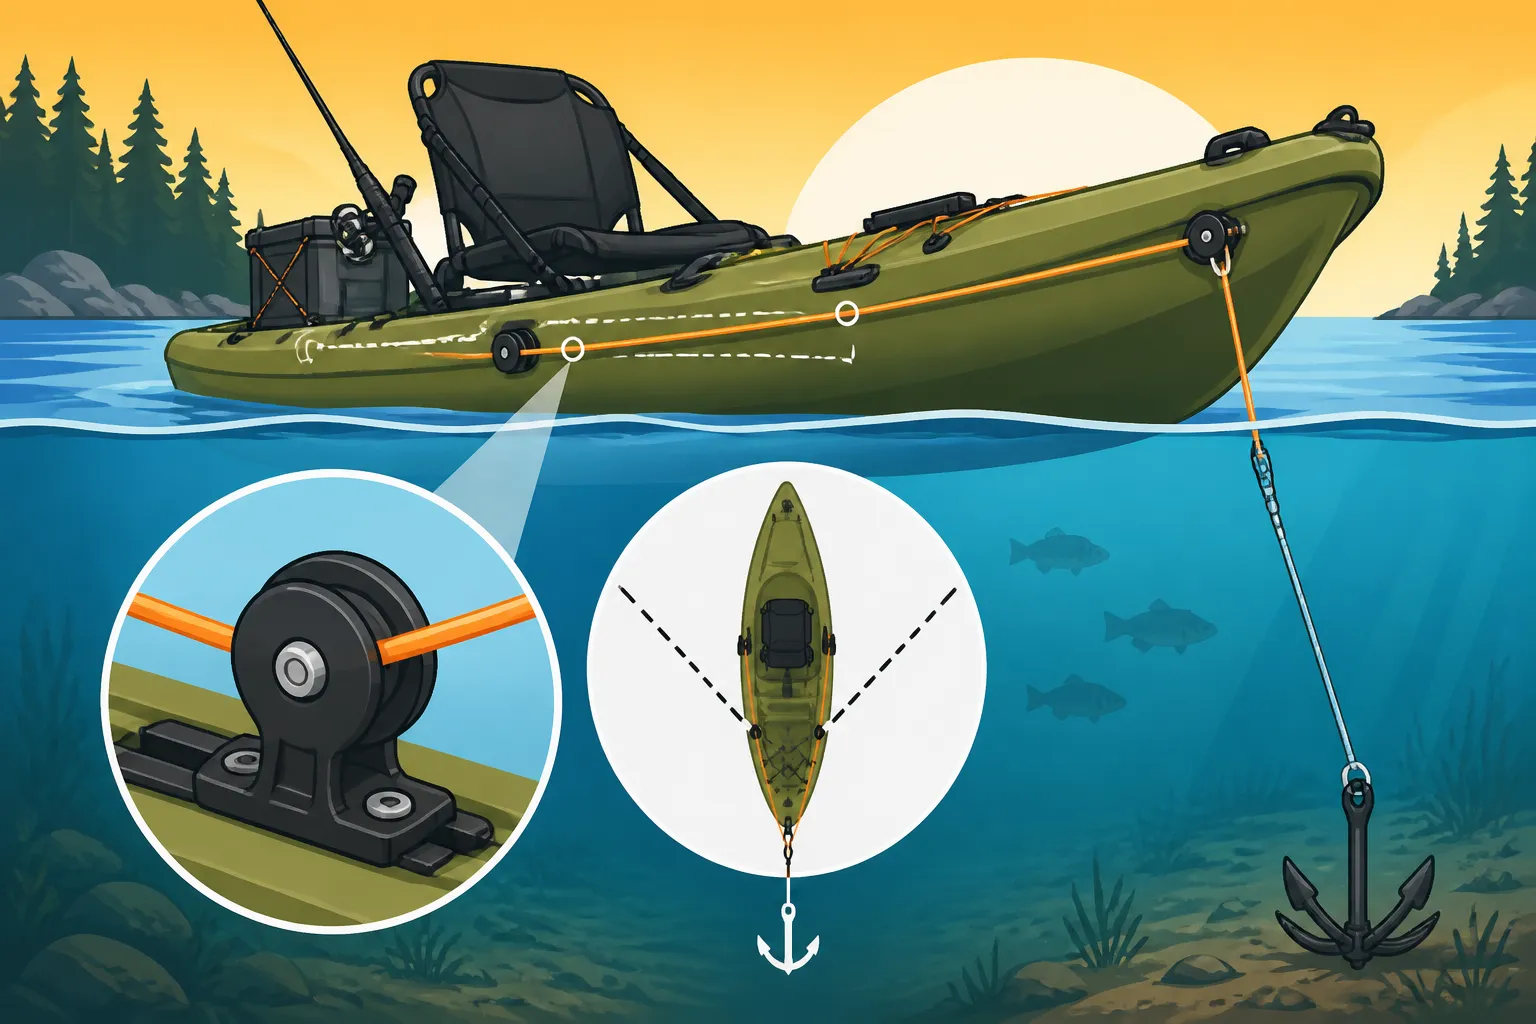
At its core, a kayak anchor trolley is a system of ropes and pulleys that runs the length of your kayak, typically from bow to stern. It allows you to quickly and easily adjust the position of your anchor point along the side of your kayak, without having to re-anchor or paddle. Think of it like a moveable attachment point for your anchor line. Instead of your anchor always being fixed to the bow or stern, an anchor trolley gives you the flexibility to shift where the anchor pulls from.
Why is this a game-changer for kayak anglers, especially here in Ontario? Well, picture this: You're trying to fish a shallow point for smallmouth bass. Without a trolley, if your anchor is fixed to the bow, the wind or current might push your stern around, making it difficult to cast accurately or maintain a good presentation. With a trolley, you can move your anchor line attachment point to the stern, and now your kayak naturally weather-vanes into the wind or current, keeping you perfectly aligned with that point. It's about control, precision, and ultimately, catching more fish. It saves you from constantly battling the elements, allowing you to focus on the fishing itself. It’s particularly useful when you need to fish a specific piece of structure or work a shoreline where the conditions might be shifting.
Components of a Standard Anchor Trolley
While many pre-made kits are available, understanding the individual components will help you appreciate how a trolley works and even aid in customising or repairing one.
- Trolley Line: This is the main rope that runs from the bow to the stern of your kayak. It's usually a small-diameter, durable, non-stretching rope, often nylon or polypropylene, designed to withstand UV exposure and water. The length will depend on your kayak, but it generally needs to be long enough to span the entire side of your boat and form a continuous loop.
- Pulleys: These are the unsung heroes of the system. Typically, two pulleys are used – one mounted near the bow and one near the stern. The trolley line runs through these pulleys. Their purpose is to reduce friction, allowing the anchor line to slide smoothly and effortlessly along the length of your kayak. Look for durable, corrosion-resistant pulleys, often made of stainless steel or high-quality plastic, as they'll be constantly exposed to water.
- Rings: Attached to the trolley line, usually with a knot or a small carabiner, are two rings (or sometimes one large ring and a small carabiner). Your actual anchor line clips into one of these rings. These rings are what you physically move along the trolley line to adjust your anchor point. The large ring is often referred to as the "trolley ring" and is what you'll typically clip your anchor line to.
- Cleat or Jam Cleat: This is a crucial piece of hardware that allows you to lock the trolley line in place once you've found your desired anchor point. A simple cleat works like those found on docks, where you wrap the line around it to secure it. A jam cleat (or zig-zag cleat) is even easier, as you simply slide the line into a grooved channel, and it "jams" to hold it fast. Some systems might use a line lock or cam cleat for quick adjustments. This is what gives you the ability to fine-tune your position and keep it there.
- Deck Mounts/Pad Eyes: These are the small attachment points secured to the kayak's hull. The pulleys are often attached to these, or the trolley line might run through them directly to guide the line and keep it flush against the kayak's side.
Benefits and Limitations of an Anchor Trolley
While an anchor trolley system can dramatically improve your kayak fishing experience, it's important to understand both its advantages and potential downsides. It’s not just a fancy gadget; it's a tool that, when used correctly, can transform how you approach fishing in various conditions across Ontario's diverse waters.
Why an Anchor Trolley Enhances Your Kayak Fishing Experience
The primary benefit of an anchor trolley is the unparalleled control it gives you over your kayak's position. This control translates into several significant advantages for any serious angler:
- Precise Positioning: Imagine you've found a promising rock pile in Lake Nipissing Fishing Guide or a submerged log in a small inland lake. With a trolley, you can drop your anchor, then use the trolley to move your boat's pivot point. This allows you to position your kayak at the exact angle you need to cast to that structure repeatedly, without drifting off course. It lets you work a spot methodically, ensuring your lure lands where the fish are hiding.
- Improved Presentation: When your kayak is stable and aligned, your lure presentation becomes more consistent. Whether you're jigging vertically for walleye, casting crankbaits for smallmouth, or drifting a worm for panfish, a stable platform means you're fighting the fish, not the elements. This is especially true in windy conditions or strong currents, where an untrolleyed kayak might spin uncontrollably.
- Enhanced Safety: While not its primary purpose, a trolley system can contribute to safety. If you hook into a large fish that suddenly pulls your kayak into an unsafe area (like rapids or heavy current), being able to quickly move your anchor line to the bow and retrieve the anchor can be a lifesaver. It prevents your kayak from getting "pinned" by the current in an undesirable position, or worse, capsizing. The ability to quickly release and retrieve your anchor is also vital if you encounter unexpected hazards.
- Versatility in Changing Conditions: Ontario weather can be unpredictable. A glassy morning can turn into a windy afternoon in a flash. An anchor trolley allows you to adapt. If the wind shifts, instead of pulling up your anchor and redeploying it from a different spot, you can simply adjust the trolley line, and your kayak will reorient itself. This flexibility means less time struggling and more time fishing. It makes fishing in diverse environments, from the calm bays of Georgian Bay to the flowing waters of the French River, much more manageable.
Potential Drawbacks and Considerations
While the benefits are clear, it's also important to be realistic about some potential downsides that you might encounter with an anchor trolley system.
- Installation Complexity: For some, the idea of drilling holes into their beloved kayak can be intimidating. While not overly complicated, installing a trolley does require some basic tools and a bit of DIY confidence. If you're not comfortable, professional installation might be an option, but it adds to the cost. Incorrect installation can lead to leaks or weakened structural points, so taking your time and following instructions is key.
- Snag Hazards: The trolley line itself, especially if it's loose or not properly managed, can become a snag point for fishing lines, paddles, or even your anchor line if it’s not fed correctly. Imagine casting a lure and having your line get tangled in the trolley system as you reel it in – a frustrating scenario. Keeping the lines taut and close to the hull is important to minimize this risk.
- Maintenance and Wear: Like any piece of gear exposed to the elements, an anchor trolley system requires maintenance. Pulleys can become gritty with sand or salt, ropes can fray, and cleats can seize up. Regular cleaning and lubrication of moving parts, especially after a trip to a silty river or a brackish bay, are essential to ensure smooth operation. Ignoring maintenance can lead to frustrating jams or even system failure when you need it most.
- Added Weight and Clutter: While minimal, the components of a trolley system do add a small amount of weight and can contribute to the "clutter" on your kayak's deck. For minimalist anglers, this might be a concern. However, for most, the functionality outweighs this minor drawback. Also, if not installed cleanly, the various lines and cleats can get in the way of other accessories or your paddle stroke.
Choosing the Right Anchor Trolley System for Your Kayak
So, you're convinced an anchor trolley is the missing piece in your kayak fishing setup. Great! But with several options out there, how do you pick the "best" one for your specific needs? It's not a one-size-fits-all situation, and what works for one angler on a calm lake might not suit another battling currents on a big river.
Factors to Consider When Selecting a System
Before you dive into purchasing, take a moment to consider these key aspects that will guide your decision:
-
Kayak Type and Size:
- Length: A longer kayak will, naturally, require a longer trolley line. Ensure the kit you're looking at provides enough rope to span your entire hull with some slack.
- Hull Design: Some kayaks have flatter, more accessible deck areas for mounting, while others might have more contours or built-in tracks. Track-mounted systems are fantastic for kayaks with gear tracks, offering tool-less adjustment and often no drilling. If you have a sit-on-top, consider where water might pool around deck mounts. For narrower river kayaks, you might want a system that tucks away very neatly to avoid snagging brush.
- Weight Capacity: While not directly related to the trolley itself, consider your kayak's overall stability and weight capacity when thinking about anchors and how you'll deploy them. A heavier anchor, or one used in strong currents, will put more strain on your trolley.
-
Fishing Style and Water Conditions:
- Still Water vs. Current: If you primarily fish calm lakes with minimal wind, a simpler, lighter-duty system might suffice. However, if you're regularly tackling rivers with strong currents or large, windy lakes (like Lake Erie or Lake Huron), you'll want a heavy-duty system with robust pulleys, strong line, and a secure cleat that won't slip under pressure. In these conditions, having a reliable anchor system is paramount for safety and effectiveness.
- Target Species: Are you drifting for panfish, or aggressively jigging for big Walleye Fishing in Ontario? The force exerted by a heavy anchor in a strong current, compounded by a strong fish, demands durable components.
- Anchoring Preference: Do you prefer a simple grappling anchor, a drag chain, or a stake-out pole? The trolley system itself is adaptable to most anchor types, but it's worth thinking about the type of anchor you typically use and how it interacts with the trolley ring. For a stake-out pole, a quick-release clip on the trolley ring is very convenient.
-
Ease of Use and Installation:
- DIY Skill Level: Be honest with yourself about your comfort level with tools and drilling. If you're handy, a basic kit or even sourcing individual components might be appealing. If not, a complete, easy-to-install kit with clear instructions is a better choice.
- Quick Adjustments: How quickly do you need to adjust your anchor point? Some cleats are faster to use than others. Zig-zag cleats, for instance, are very quick for on-the-fly adjustments compared to traditional rope cleats that require wrapping.
- Maintenance Access: Consider how easy it will be to clean and maintain the components once installed. Will pulleys be easily accessible, or will they be tucked into awkward spots?
DIY vs. Pre-made Kits
This is often where anglers hit a crossroads: build your own or buy a ready-to-install package? Both have their merits.
-
Pre-made Kits:
- Pros: Convenience is the biggest factor here. Everything you need is typically included, often with clear instructions. The components are usually designed to work together seamlessly. You can find excellent options from reputable brands online and at big box outdoor retailers. Retailers like Bass Pro Shops offer a range of comprehensive kits that include everything from marine-grade pulleys to high-quality line and robust cleats. You'll often find these kits designed for general kayak use, making them a safe bet for most anglers. Online marketplaces like Amazon also provide a vast selection, often with user reviews to help guide your choice, and sometimes at a more budget-friendly price point.
- Cons: Less customization. You're limited to the components provided in the kit. If one part fails, it might be harder to find an exact replacement unless it's a widely available component. They might also be slightly more expensive than sourcing individual parts.
-
DIY Systems:
- Pros: Total customization. You can choose every component to meet your exact specifications for quality, material, and colour. This is great for those who want heavy-duty stainless steel pulleys or a specific type of cleat. It can often be more cost-effective if you already have some components or can source them cheaply. This approach allows you to build a system perfectly tailored to your kayak and specific fishing conditions, whether you're dealing with the demanding currents of the Niagara River or the tight spaces of a small pond.
- Cons: Requires more research and knowledge to select compatible and durable parts. You'll need to know exactly what you're doing with measurements and installation. There's no instruction manual specific to your custom build, so you're relying on your own expertise or general online tutorials. If you're a beginner, this might be a daunting task.
| Feature | Pre-made Kits | DIY Systems |
|---|---|---|
| Convenience | High – all parts included, often with instructions | Low – requires sourcing individual components |
| Customization | Low – limited to kit components | High – select every component to spec |
| Cost | Mid-range to high, depending on brand and quality | Potentially lower if components are sourced wisely, or higher for premium parts |
| Installation | Often straightforward with provided instructions | Requires more planning and knowledge, less guided |
| Quality Control | Consistent within the kit's brand | Dependent on individual component choices |
| Best For | Beginners, those seeking simplicity, general use | Experienced DIYers, specific needs, budget-conscious (sometimes) |
Installation and Maintenance Tips
Once you've chosen your anchor trolley system, the next step is getting it properly installed and then taking care of it so it serves you well for many seasons of Ontario fishing. Remember, a well-installed and maintained system is a reliable system.
Step-by-Step Installation Guide
While specific instructions will vary slightly depending on your kayak and the kit you choose, here's a general overview of the process. Always refer to your kit's specific instructions for details.
- Plan Your Layout: This is the most critical step. Decide which side of your kayak you want the trolley on (most people pick the dominant casting side). Lay out all your components on the kayak. Mark the approximate locations for your pulleys, cleats, and any pad eyes. Ensure the line will run smoothly from bow to stern, clear of your paddle stroke, gear tracks, and scupper holes. Test the path of the line with your paddle to make sure it doesn't interfere. Think about access – you want the cleat to be within easy reach while you're seated.
- Mark and Drill Pilot Holes: Once you're confident in your layout, use a marker to precisely mark where each screw or rivet will go. Crucially, use a drill bit that is slightly smaller than the screws or rivets you'll be using. Drill slowly and carefully, ensuring you don't drill completely through the other side of your kayak's hull unless specified (some fittings might be through-bolted). Be mindful of internal wiring or flotation.
- Mount the Components:
- Pulleys: Attach the pulleys at the bow and stern using screws or rivets and, very importantly, marine-grade silicone sealant. This sealant creates a watertight seal, preventing water from entering your kayak through the screw holes.
- Cleats/Jam Cleats: Mount your chosen cleat within easy reach, usually near the cockpit, again with marine-grade sealant. Test its position from your seated fishing position to ensure comfort and ease of use.
- Pad Eyes (if applicable): If your system uses intermediate pad eyes to guide the line, install these along the side, making sure they maintain a clean, straight line for the trolley rope.
- Thread the Trolley Line: This is where it all comes together.
- Tie a small loop or secure a carabiner to one end of your trolley line.
- Thread the other end of the line through the bow pulley, then down the side of the kayak, through any pad eyes, and through the stern pulley.
- Bring the line back up the side of the kayak and thread it through the cleat.
- Finally, connect the free end of the line to the loop or carabiner you started with, forming a continuous loop. Adjust the tension so it's taut but not overly tight.
- Attach the Trolley Ring: Securely attach your trolley ring(s) to the continuous trolley line using appropriate knots (like a double fisherman's bend) or small carabiners. This is where your anchor line will clip in.
- Test the System: Before hitting the water, give your new trolley a thorough test. Operate it from your seated position, moving the ring from bow to stern and back again. Ensure it slides smoothly, the cleat holds securely, and nothing snags or interferes. This is also a good time to double-check all mounting points for stability.
Keeping Your Anchor Trolley in Top Shape
Just like your Best Tackle Box Setup for Ontario Anglers, your anchor trolley needs a little love to stay functional. Regular maintenance will prolong its life and prevent frustrating failures on the water.
- Rinse After Every Use: Especially if you've been in silty rivers or the Great Lakes. A quick rinse with fresh water will remove salt, sand, and grime that can cause wear on your rope and pulleys.
- Inspect Components Regularly: Before each outing, quickly check all parts:
- Rope: Look for fraying, nicks, or excessive wear. If the line is compromised, replace it immediately.
- Pulleys: Ensure they spin freely and aren't seized or gritty. Clean out any debris that might have accumulated.
- Cleats: Check that they still grip the line securely and aren't corroded.
- Mounting Points: Verify that all screws or rivets are tight and that the marine sealant is intact. If you notice any wobbling or water ingress around the mounts, address it promptly.
- Lubricate Pulleys (as needed): If your pulleys start to feel stiff, a small amount of marine-grade lubricant (like silicone spray or a dry lubricant) can help them run smoothly again. Avoid oily lubricants that can attract dirt.
- Store Properly: When not in use, consider loosening the tension on the trolley line slightly, especially if your kayak is stored outdoors in varying temperatures. This can prevent unnecessary stress on the components. If possible, store your kayak in a shaded area to minimize UV exposure, which can degrade rope and plastic parts over time.
- Troubleshooting Common Issues:
- Sticking Line: This is usually due to dirty pulleys, a frayed line, or sometimes, overtightening the line during installation. Clean pulleys, replace the line if damaged, and ensure proper tension.
- Loose Cleat: If your cleat isn't holding the line, it might be worn, or the line itself might be too thin for the cleat. Replace the cleat or use a slightly thicker line.
- Water Leaks Around Mounts: This is serious. Re-seal the screws with fresh marine-grade silicone or, if persistent, consider using well nuts for a more robust, watertight seal.
By taking these steps, your kayak anchor trolley system will be a dependable companion on countless fishing trips, allowing you to focus on the thrill of the catch rather than the frustration of drifting. It truly is a simple upgrade that makes a world of difference for the serious kayak angler in Ontario. You might also find it helpful to look into other Kayak Fishing Techniques for Ontario Lakes to fully integrate your new anchoring capabilities into your fishing strategy.
Disclaimer
This article is for general informational purposes only and does not constitute professional advice. Laws, prices and regulations vary by location and change over time. Consult a qualified professional for guidance on your specific situation.