Best bobber stopper setup for suspending bait
There are few things more frustrating than knowing fish are suspended at a specific depth, but your bait just won't stay there. Whether you're targeting elusive walleye hugging a thermocline, perch suspended over deep weed beds, or panfish just off the bottom in a shallow bay, getting your bait to consistently hang right in their strike zone is absolutely critical. This guide will walk you through the ins and outs of the best bobber stopper setups, ensuring your bait presents perfectly every time you hit the waters of Ontario.
The Undeniable Advantage of Suspending Bait
Many anglers, especially those new to the game, often think of fishing with a bobber as a simple, static affair – cast it out and wait. But experienced Ontario anglers know that actively suspending your bait at a precise depth is a sophisticated technique that can dramatically increase your catch rate. Fish don't always hang out on the bottom or near the surface; often, they're suspended in the water column, perhaps because of water temperature, oxygen levels, or the location of baitfish.
Imagine you're out on Lake Simcoe targeting jumbo perch. You've found a school on your sonar, but they're sitting in 30 feet of water, about 10 feet off the bottom. If you're just using a bottom rig, you're missing them completely. If you're using a fixed bobber, your bait might only reach a few feet down. This is where the magic of a good bobber stopper setup comes in. It allows you to set your bait precisely at 20 feet, right in front of those suspended perch, maximizing your chances of a bite. It's about presenting your offering exactly where the fish are, rather than hoping they'll come to where your bait is.
Why Precision Depth Control Matters
The ability to control your bait's depth with pinpoint accuracy is a game-changer across various Ontario fishing scenarios. Think about fishing for walleye in the Bay of Quinte. These fish are notorious for relating to specific depths, often just off structure or in the thermocline during warmer months. If your minnow or worm isn't presented exactly where they are, they might not expend the energy to move for it. A slight adjustment of your bobber stopper can be the difference between a slow day and a banner day.
This precision is also vital when dealing with currents, whether in a river like the French River or a large lake with subtle drifts. A properly set bobber stopper ensures your bait remains at the desired depth as it drifts, rather than rising or falling with variations in current speed. This consistent presentation is what coaxes wary fish into biting. It allows you to methodically work a section of water, confident that your bait is precisely where you want it.
Common Frustrations Without the Right Setup
We've all been there: tangled lines, bobbers that refuse to stay put, or bait that either sits on the bottom collecting weeds or floats uselessly near the surface. These frustrations can quickly sour a fishing trip. A poorly chosen or incorrectly rigged bobber stopper can slip, letting your bait drift to an undesired depth. Or, it can be so bulky it impedes casting, especially with lighter baits or in windy conditions.
Another common headache is when you're using live bait, like active minnows, that try to swim away. If your stopper isn't secure, that little minnow's constant tugging can slowly drag your bobber stopper up or down the line, ruining your depth presentation. By investing a little time in understanding and setting up the right bobber stopper system, you can eliminate these common annoyances and focus on the joy of fishing itself.
Deciphering the Anatomy of a Bobber Stopper Setup
To build the best bobber stopper setup, you need to understand its individual components and how they work together. It's more than just a piece of string; it's a system designed for maximum adjustability, durability, and castability. Let's break down the essential elements.
The Stopper Itself: Options and Their Merits
The bobber stopper is the unsung hero of this setup. It's the small but mighty device that holds your bobber exactly where you want it. There are several types, each with its own advantages and disadvantages.
String or Knot Stoppers
These are arguably the most popular and versatile. They consist of a small piece of specialized string or a pre-tied knot that cinches onto your fishing line. They come with a plastic sleeve or a small wire loop that helps you thread your main line through the knot before pulling it tight.
- Pros: They are incredibly adjustable, can be easily slid up and down the line to change depth, and are very small and unobtrusive, making for smoother casting. They also pass through rod guides with minimal friction, which is crucial for deeper presentations where the stopper might need to enter the reel. You can often buy these in multi-packs, offering great value, and many anglers stock up at places like Bass Pro Shops or find a wide selection online via Amazon.
- Cons: If not tied correctly or if the string material isn't right, they can sometimes slip under extreme tension or repeated casting. They can also fray over time. Using the right knot and ensuring it's cinched tight without damaging your main line is key.
Rubber Bobber Stoppers
These are small, cylindrical, or oval-shaped rubber pieces with a hole through the middle. They often come pre-rigged on a wire loop for easy threading onto your main line.
- Pros: Extremely secure once positioned, very durable, and quick to rig. They offer a strong grip on the line, making them great for heavier baits or in strong currents where slippage is a concern.
- Cons: Can be more difficult to adjust on the fly, especially with wet hands or in cold weather. They tend to be bulkier than string stoppers and might not pass through smaller rod guides as smoothly, which can limit how deep you can fish if the stopper needs to go into your reel.
Spring Bobber Stops
These are less common for general suspending bait but are sometimes used. They are small metal springs that you twist onto your line.
- Pros: Very easy and quick to put on or take off the line without cutting.
- Cons: Can be quite bulky, tend to cause more line twist, and their grip isn't always as secure or adjustable as string stoppers. Generally not recommended for precise, deep suspending bait applications.
Here's a quick comparison of the most common bobber stopper types:
| Stopper Type | Ease of Adjustment | Line Compatibility | Castability | Security | Durability |
|---|---|---|---|---|---|
| String/Knot | Excellent | All types | Excellent | Very Good | Good |
| Rubber | Fair to Good | Mono, Fluorocarbon | Good | Excellent | Excellent |
| Spring | Good | All types | Fair | Good | Excellent |
The Right Bobber: Slip vs. Fixed
Your choice of bobber is just as important as your stopper. For suspending bait at variable depths, a slip bobber is almost always the superior choice.
Slip Bobbers
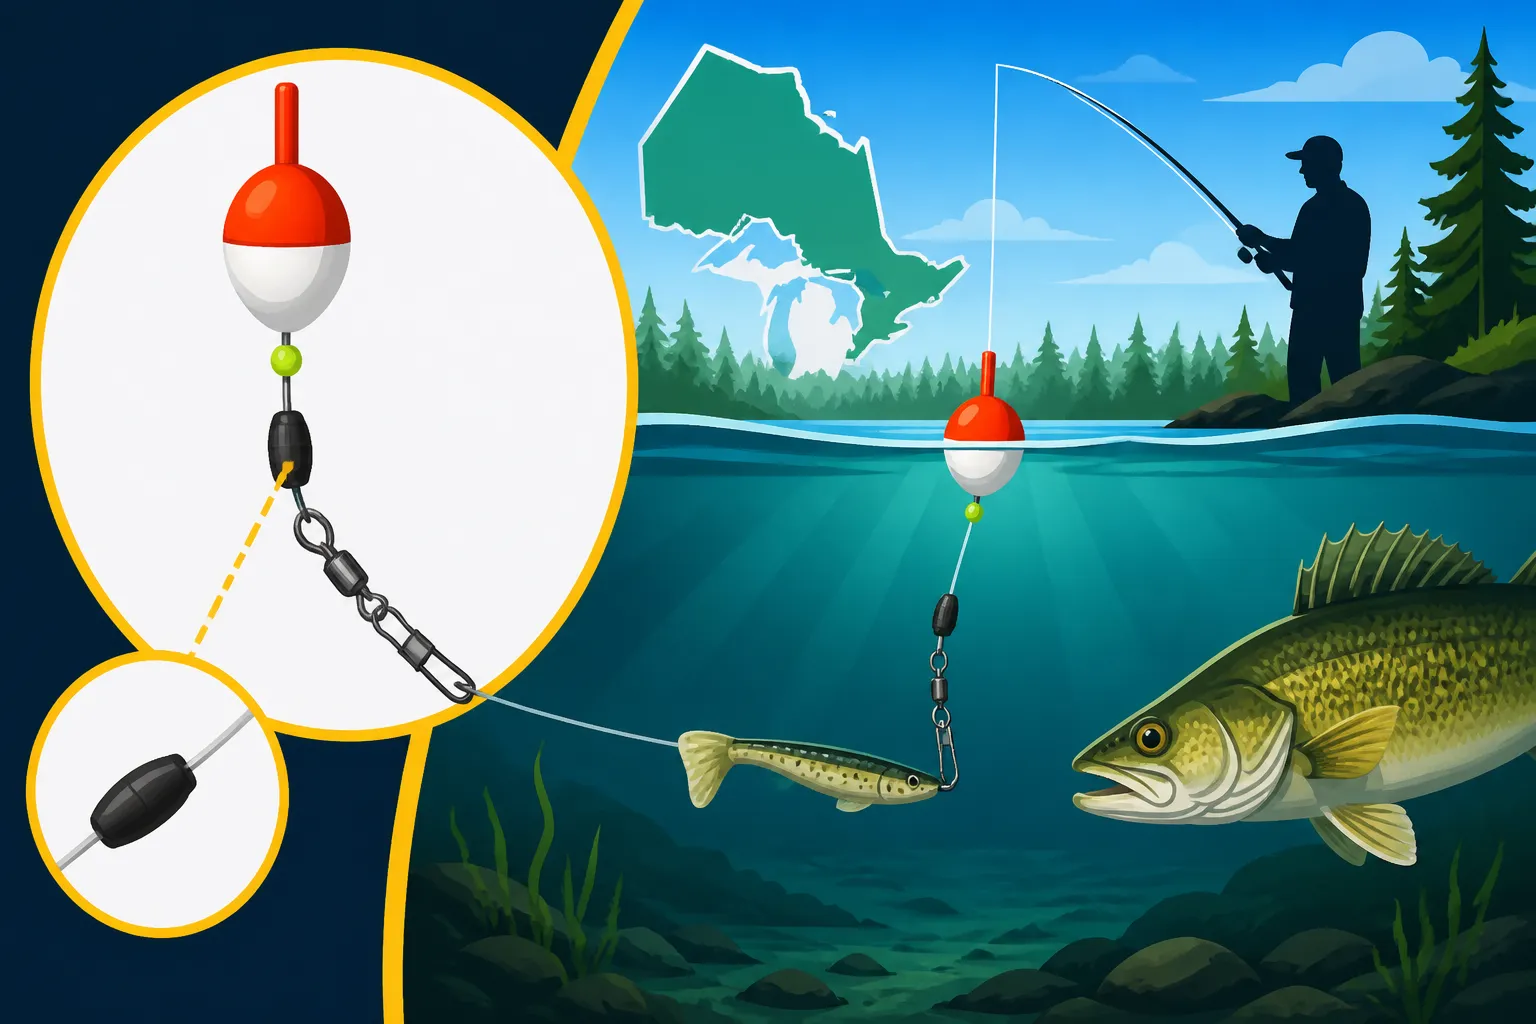
These bobbers have a hole running through their center, allowing your fishing line to "slip" through them. The bobber stopper sits above the bobber, preventing it from sliding further up the line than your desired depth.
- Benefits: This design allows you to reel your bait right up to your rod tip for easy casting, even when fishing very deep. The bobber simply slides down the line to rest above your bait, only stopping at the pre-set depth once it's in the water. This is crucial for deep-water fishing on Lake Superior or Lake Huron where you might be targeting lake trout. How to Catch Lake Trout in Ontario often involves suspending bait.
- Types: Slip bobbers come in various sizes and materials, from lightweight foam to weighted balsa or plastic. Choose one that's sensitive enough to detect bites but large enough to support your bait and any added weight without sinking.
Fixed Bobbers
These bobbers are clipped or tied directly onto your line at a fixed position.
- Limitations: While great for shallow water or still fishing, they are impractical for deeper presentations because the bobber is fixed on the line, making it impossible to reel your bait in closer than the bobber's position. Imagine trying to cast a fixed bobber set to 20 feet deep – you'd have 20 feet of line dangling from your rod tip, which is impossible to cast effectively.
Weighting and Bait Selection
The final pieces of the puzzle are your weight and bait.
- Weight: Split shot or small sliding sinkers are often used below the bobber to get your bait down to the desired depth quickly and keep it there. Ensure you use just enough weight to allow your bobber to stand upright and be sensitive, but not so much that it pulls the bobber under. Too much weight can also make your presentation look unnatural.
- Bait: Whether you're using live minnows, worms, leeches, or even small artificial lures like a jig tipped with a soft plastic, the bobber stopper setup accommodates them all. For targeting panfish, a small worm or grub on a light wire hook can be deadly when suspended just above submerged cover. Best Tackle for Panfish would be a great resource for bait ideas.
Rigging the Best Bobber Stopper Setup: A Step-by-Step Guide
Now that we know the components, let's get down to the actual rigging. This process is straightforward, but doing it correctly will save you a lot of headaches on the water.
Step 1: Threading the Bobber Stopper
This is the very first thing that goes on your main line.
- Select your stopper: For most suspending bait applications in Ontario, I highly recommend a quality string (knot) bobber stopper. They offer the best blend of adjustability and castability. You can find excellent multi-packs at your local Bass Pro Shops or even larger assortments on Amazon.
- Pass your line: Most string stoppers come with a small plastic tube or a thin wire loop. Carefully thread your main fishing line through this tube or loop. It can be a bit fiddly, especially with cold fingers or thin line, so take your time.
- Slide the knot: Once your main line is threaded through the tube/loop, slide the pre-tied string knot off the tube and onto your main line. The tube or loop will help guide the line through the knot.
- Cinch it down: Gently pull on both ends of your main line, away from the knot, to snug the stopper knot down onto your line. Don't pull too hard, as you can damage your line, but ensure it's tight enough that it won't slip easily. Trim any excess tag ends from the stopper knot, leaving a little bit of length (about 1/4 inch) so you can still adjust it later if needed.
Step 2: Adding the Bead and Slip Bobber
These two components work together to ensure your bobber moves freely but doesn't get stuck on your stopper knot.
- The bead: Immediately after your bobber stopper, slide a small plastic or glass bead onto your main line. This bead is absolutely essential. It provides a smooth surface for the bobber to slide against and, critically, prevents the small stopper knot from pulling through the larger hole of your slip bobber. Without this bead, your stopper knot would simply pass through the bobber's opening, rendering it useless.
- The slip bobber: Now, thread your main line through the center hole of your slip bobber. Ensure the line passes cleanly through and that the bobber can slide freely up and down the line. You'll notice how it slides all the way down to the bead, allowing you to reel it in tight for casting.
Step 3: Attaching Weight and Hook/Lure
This is where your bait presentation takes shape.
- Secure your hook/swivel: At the very end of your main line, tie on your hook, or if you prefer, a small swivel (size 10-14 is usually fine) to which you can then attach a leader with your hook or lure. Tying a swivel first can prevent line twist, especially when using live bait. Use a strong, reliable knot like a Palomar or improved clinch knot.
- Add split shot: About 6-12 inches above your hook or swivel, crimp on one or more split shot weights. The amount of weight will depend on the size of your bobber and the bait you're using. You want just enough weight to make the bobber stand up properly in the water and sink your bait efficiently, but not so much that the bobber is mostly submerged or easily pulled down by a light bite. For walleye, a single large split shot or a couple of medium ones can be perfect. For panfish, much smaller weights are appropriate.
- Attach your bait: Finally, rig your chosen bait onto your hook. Whether it's a live minnow, a juicy worm, a leech, or a small jig, ensure it's securely attached and presented naturally. For walleye, a lively minnow is often irresistible when presented correctly. You might refer to Best Live Bait for Walleye Trolling for bait ideas, though here we're talking about suspending.
Step 4: Setting Your Depth
This is where the bobber stopper truly shines.
- Measure: Determine the depth you want to fish. If you know the bottom depth from a fish finder (say, 25 feet) and want to fish 5 feet off the bottom, set your depth to 20 feet.
- Adjust the stopper: Simply slide the stopper knot up or down your main line until the distance between the knot and your hook is the desired depth. For deeper presentations, this might mean pulling a lot of line through. You can usually use a ruler or just eyeball it if you're fishing a relatively consistent depth.
- Test and refine: Cast your setup out. Watch how the bobber sits in the water. If it's too submerged, reduce weight. If it's lying flat, add weight. If your bait isn't reaching the desired depth, adjust the stopper up the line. If it's hitting bottom, adjust it down the line. It's often a bit of trial and error to get it just right for the conditions.
Tips and Tricks for Optimal Performance in Ontario Waters
Once you have your basic bobber stopper setup down, there are several advanced tips and considerations that can further enhance your fishing experience in Ontario's diverse waters.
Matching Your Setup to the Species and Conditions
Different fish species and varying environmental conditions call for nuanced adjustments to your bobber stopper setup.
For Walleye in Deeper Lakes
When you're chasing walleye on deeper bodies like Lake Nipissing or targeting them after the Ontario Walleye Opener Dates by Zone, they often suspend over rocky humps, submerged points, or deep flats, especially during the day.
- Stopper choice: Stick with a high-quality string stopper for deep-water presentations. They glide through rod guides better, allowing you to reel in a fish caught at 25+ feet without the stopper getting hung up.
- Bobber type: A larger, more buoyant slip bobber will be necessary to support a heavier minnow (like a shiner) and enough split shot to get it down quickly. Look for slip bobbers with some weighting in the bottom to help them stand upright.
- Line: Use a main line that's appropriate for walleye – 6-10 lb test monofilament or fluorocarbon. If using braid, a short mono or fluoro leader is a good idea, as stoppers can sometimes slip more easily on braid, though specialized braid stoppers exist.
- Technique: Position your bait just above the fish you see on your sonar. Walleye generally feed up, so being slightly above them is often more effective than below. Experiment with slow drifts, letting the wind or current move your boat gently across suspected holding areas. How to Catch Walleye in Ontario covers more general techniques.
For Panfish and Perch
When targeting crappie, bluegill, or yellow perch, particularly in productive areas like Lake Simcoe or the Kawartha Lakes, a more delicate approach is often best. Ontario Yellow Perch Limit on Lake Erie and Simcoe shows how popular this species is.
- Stopper choice: Again, a string stopper works wonderfully here, allowing for precise adjustments when fish are holding tight to cover.
- Bobber type: Opt for a much smaller, more sensitive slip bobber, like a cigar or teardrop shape. This will detect the often subtle bites of panfish. A small foam or balsa wood bobber is perfect.
- Line and Weight: Go lighter on your main line (4-6 lb test) and use minimal split shot. Sometimes just the weight of a small jig head and bait is enough.
- Bait: Small worms, maggots, wax worms, or tiny jigs tipped with soft plastics are excellent. Suspend them just above submerged logs, weed edges, or brush piles. Panfish are often found in tight schools, so once you find one, you're likely to find many. Best Techniques for Panfish in Ontario is a great reference for this.
Fine-Tuning Your Setup for Wind and Current
Wind and current are constant factors on Ontario's large lakes and flowing rivers. A well-rigged bobber stopper setup can help you contend with them.
- Wind: In windy conditions, a heavier, more aerodynamic bobber will cast better and drift less erratically. If the wind is creating too much bow in your line, consider using fluorocarbon line which sinks, reducing the wind's surface impact. Keep your rod tip low to the water to minimize wind interference with your line.
- Current: For fishing rivers like the Ottawa River, current is your main challenge. You might need to use slightly more weight to ensure your bait gets down quickly and stays at the desired depth as it drifts. Experiment with different current seams and eddies where fish might be holding out of the main flow. The bobber stopper allows your bait to be presented naturally in the current, mimicking a free-floating meal.
Maintaining Your Gear for Longevity
Your bobber stopper setup, while simple, benefits from a little care.
- Check your stoppers: Over time, string stoppers can fray or loosen. Always check them before each outing. If a stopper looks worn or starts slipping, replace it. Carrying spare stoppers in your tackle box is a smart move. You can buy bulk packs of these small items from retailers like Bass Pro Shops or even pick up various styles and materials from Amazon.
- Inspect your line: Regularly check your main line for nicks or abrasions, especially near the stopper or where split shot are crimped. These weak spots can lead to frustrating break-offs.
- Clean your bobbers: After a day on the water, give your bobbers a quick rinse to remove any grime or algae, which can affect their buoyancy and visibility.
By understanding the components, mastering the rigging process, and applying these practical tips, you'll be well on your way to effectively suspending your bait and catching more fish across the beautiful waters of Ontario.
Disclaimer
This article is for general informational purposes only and does not constitute professional advice. Laws, prices and regulations vary by location and change over time. Consult a qualified professional for guidance on your specific situation.